The factory (Hoshizaki) recommends that at least once a year the machine is cleaned and sanitized to keep proper operations. All depending on your water and environment, you might need to clean your ice maker more.
First, you want to remove all the ice from the storage bin to prevent the cleaning solution from getting on any of your ice. You do not want the ice to get contaminated. Next, shut the water off and drain the water from the sump tank. Depending on the model of the unit there are several ways to accomplish this. , There is a drain or suction hose that you can pull off and let the water drain inside the bin on most small KM's. In some models the overflow pipe needs to be removed to allow the water to drain out. By turning the pipe counter-clockwise will allow it to be removed. The stackable KM's, has a plug towards the front of the unit, which can be removed to drain the water from the sump. KML ice makers has an easy automatic drain switch, which will allow the service person to use the units water pump to drain the water out of the sump. On the KML models a drain plug is included so the sumo area can be drained easily.
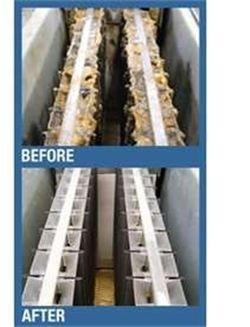
Now you're ready to clean the Evaporator. Because, of Hoshizaki's unique stainless steel evaporator any commercial ice machine cleaner can be used, a nickel safe type cleaner is not required. Hoshizaki recommends LIME-A-AWAY or Hoshizaki Scale Away. Mix you're ice maker cleaner with warm water in a pail or bucket and follow the instructions on the rear of the front panel for the proper mixture parts. Pour the mixed solution inside the sump and put the toggle switch to the wash position.
The KM units also have an additional cleaning valve that should be moved to the clean or open position. It will allow the cleaning solution to flow in between the evaporator plates as well as over the ice making side of the plate. It normally is only necessary to leave this valve open for about 5 minutes at the beginning of the cleaning cycle. It is very important to move the valve back to the closed position for the ice maker to make ice, for the compressor will not turn on if this valve is closed. The KML units will not have the manually operated cleaning valve, instead it has a solenoid valve that will automatically turn on when the second toggle switch is moved to the wash position. The KML units have 2 toggle switches, one is marked (Service, Off, and Ice) and the other (Drain, Circulate, and Wash.) The first switch, when moved in the Service position, will allow you to disengage the compressor and engage the second toggle switch. With this switch you can drain the unit or circulate the cleaning solution.
The cleaning solution should be circulated until the plates are clean. This may require a extra amount of time depending on how dirty the unit is. There may be times that a more thorough cleaning may be required if the ice maker has not been maintained properly.
Now empty the sump by one of the methods mentioned above. With the sump empty remove the check valve, spray tube & float switch along with the rubber connector. These components should be taken apart and soaked in ice machine cleaner to allow the acid to break down any particle build up. While these components are soaking, remove the inlet water valve strainer and wash. It is also a great idea to take the water valve apart and make sure that the diaphragm is clean of scale and also check to make sure that the diaphragm's weep hole is clean and clear.
Now that your ice machine is clean the unit could also be sanitized. The de-scaling chemicals will not clear the bacteria that can buildup on the ice maker. You should run the sanitizing through the ice machine in the same way that the cleaner was circulated
Re-assemble all the parts back to original place
Caution: do not mix the cleaner and sanitizer together for it could be harmful.
One other note is to clean the storage bin if applicable for the storage bins will build up scale and algae at the bottom of the bin.
Remember your ice maker will increase the life of the machine and decrease service calls. Let us know if you have any questions concerning any Hoshizaki ice makers or products. 1-800-913-0192


